Enterprise Application Security Development Best Practices
Application security is exactly what it sounds like – making an application secure so as to prevent breaches that compromise proprietary and/or sensitive information. As the partner responsible for application construction and deployment at MercuryWorks, I ensure that we start by architecting application security in a secure fashion from inception. This blog post provides some of the details on how we embed security in application construction.
Why Is Application Security Important?
Data Protection
Enterprise applications commonly store and transfer sensitive information between the cloud and users’ devices and servers. This information often includes personal details, financial records and other confidential business data. Businesses and regulatory requirements classify a greater range of information as sensitive than many engineers might inherently think. Through robust application security practices, guaranteeing the security of this data is crucial to prevent any unauthorized access, manipulation attempts, system hacks and reportable security events.
Preventing Unauthorized Access
Modern services-oriented architectures implement robust and broad APIs to feed and gate all reads and updates to enterprise data. Unauthorized access to these APIs constitutes a data breach and can lead to service disruptions and/or misuse of resources. Proper authentication and authorization mechanisms are essential to ensure that only authorized users or systems are able to access the API endpoints and perform permitted actions.
Protecting Against Attacks
Enterprise applications are susceptible to various attacks such as SQL injection, cross-site scripting (XSS) and cross-site request forgery (CSRF) with API endpoints and JavaScript-based interfaces as the attack venue. Implementing security best practices such as input validation, output encoding, and secure communication protocols are table stakes for risk mitigation.
Compliance Requirements
Many industries have regulatory requirements or standards related to data security and privacy (SOX, HIPAA, PCI, etc.). Compliance with these standards is essential for legal and reputational reasons, and ensuring the security of APIs, user interfaces, middleware and their interactions is a critical aspect of compliance.
Maintaining Trust
Users and clients expect the services they interact with to be secure. A breach or compromise of an application leads to a loss of trust in the organization or service provider, resulting in repetitional damage and potential loss of customers or partners.
Enterprise Web Application Security
JSON Web Tokens (JWTs) are an open, standard way to securely represent a user’s identity during interactions between a client (a web or mobile application) and a server (typically an API). When systems exchange data, JWTs allow identification without transmitting private credentials on every request.
Here’s a deeper dive into how JWTs work and their key components:
Authentication->Authorization
In enterprise application security circles, a strict distinction is drawn between authentication (“AuthN”) and authorization (“AuthZ”): authentication is knowing the user’s identity within the application while authorization is defined as knowing what the user should be allowed to do in the application. Upon successful authentication, the authentication server generates a JWT that contains relevant user information, known as claims. These claims include details such as the user’s ID, role, and any other pertinent data.
Token Issuance
Once the JWT is generated, the authentication server signs it using a secret key to ensure its integrity. The server then sends this JWT back to the client (UI) as part of the authentication response.
Subsequent Requests
When the client needs to make subsequent requests to the API, it includes the JWT in the Authorization header of the HTTP request. This JWT serves as proof of the user’s identity and permissions.
API Access Validation
Upon receiving the JWT, the API validates it to ensure its authenticity and integrity. This validation involves verifying the JWT’s signature, expiration time, and any other relevant claims. If the JWT is valid, the API processes the request accordingly.
Stateless Communication
One of the significant advantages of JWTs is their self-contained nature. Since all necessary information is encoded within the token itself, the API does not need to maintain session state. This stateless communication model makes JWTs highly scalable and efficient, particularly in distributed systems or microservices architectures.

More About Application Security Authorization
Authorization determines what actions a user is allowed to perform after authentication (manifesting as the claims referenced above). It involves granting or denying access to specific resources or functionalities based on roles, claims, or policies. Here are some examples:
- Role-Based Authorization
- Assigns roles to users (e.g., admin, viewer)
- Example: An admin can edit user profiles, while a viewer can only read data
- Claims-Based Authorization
- Uses attributes (claims) associated with the user
- Example: A user with the “subscription_level” claim set to “basic” can only access free content. Whereas someone with the “subscription_level” claim set to “premium” can access all your application has to offer
- Policy-Based Authorization
- Defines custom policies based on business rules
- Example: You may have many different types of managers (e.g. Engineering Manager, Maintenance Manager) using the application. A policy can be defined which says, “Any type of Manager can approve expense reports.”
- Resource-Based Authorization
- Determines access based on the resource being accessed
- Example: A user can edit their own profile but not others’
Introducing MSAL
The Microsoft Authentication Library (MSAL) seamlessly integrates authorization, JWT handling, and authentication into a unified system. While it primarily emphasizes authentication, it also holds significance in the authorization process. By streamlining token management, MSAL empowers developers to effortlessly obtain security tokens from the Microsoft identity platform, ensuring a cohesive and secure authentication experience.
The following are a set of application security features that MSAL provides for engineers:
- Authentication
- MSAL handles the authentication flow and overall user identification process of user identity
- It supports various authentication scenarios, including:
- Interactive Authentication: Users sign in interactively (e.g., via a web page or native app)
- Silent Authentication: Tokens are acquired without user interaction (e.g., when tokens are cached)
- Device Code Flow: Suitable for devices with limited input capabilities (e.g., smart TVs, IoT devices)
- Integrated Windows Authentication (IWA): For Windows desktop and mobile apps
- Access Tokens
- After successful authentication, MSAL obtains an access token
- These tokens are used to access secured APIs (e.g., Microsoft Graph, custom APIs)
- MSAL handles token management, including caching and automatic token refresh
- Scopes and Permissions
- When requesting tokens, you specify scopes (permissions)
- Scopes define what resources the token can access (e.g., read user profile, write to user profile)
- MSAL ensures that the user consents to the requested permissions
- Application Registration
- MSAL enforces a stringent configuration set in the Entra ID portal with a unique app client ID
- Integration with App
- MSAL integrates into your enterprise app with the appropriate SDK and registered client ID
- MSAL provides methods to acquire tokens and handle authentication flows in your app
- Token Validation and API Calls
- MSAL also provides token validation functions to ensure the token isn’t expired, is issued for the right audience, etc.
- MSAL enables enterprise apps to retrieve authorized user data from Microsoft Graph via token-authorized API calls
Configuring React for MSAL
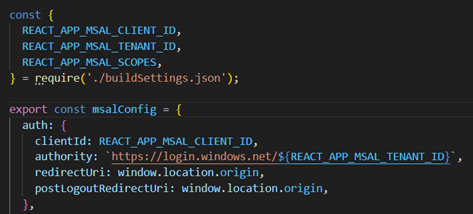
React is Mercury’s JavaScript framework of choice so our examples are written from a React orientation. To implement Mercury’s brand of JWT-based enterprise application security within an Azure ecosystem, the application must be registered with Microsoft Entra ID in the Azure Portal. This process will create a Client ID for the app and a Tenant ID. The Client ID represents the App Registration, and the Tenant ID represents the organization to which the Client ID belongs. These IDs will be managed internally by the developers and are used to configure the React application.
These IDs are passed into the React build to be consumed by the two primary libraries that manage interaction with the UI to Microsoft’s Authentication APIs. Those two libraries are @azure/msal-browser and @azure/msal-react. Here is an example of configuring MSAL in React:
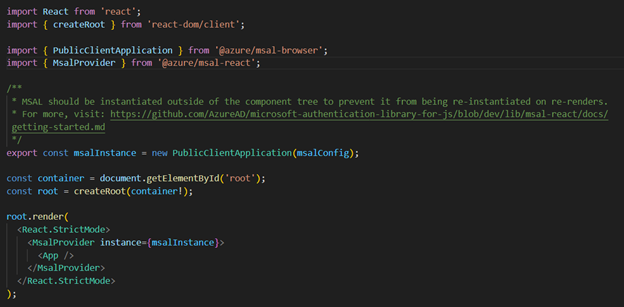
Once configuration is in place, we need to create an instance of MSAL that will be used by React to fetch the user in context or prompt for authentication. We pass this instance to Microsoft’s MsalProvider component to make it available to all other MSAL components that rely on it.
Here we wrap the MsalAuthenticationTemplate component from the @azure/msal-react library around a generic React UI composition to make it protected, which means the user must be authenticated for the UI to render on screen.
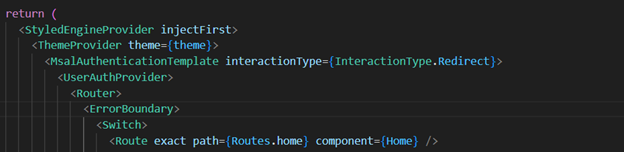
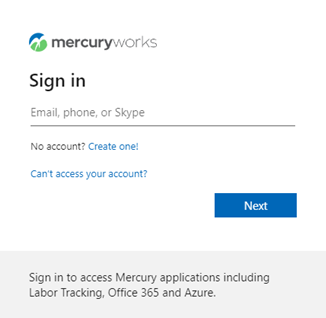
From here on out, we continue to compose the app using the MsalAuthenticationTemplate wrapper on all parts of the UI that require authentication. If the user is not already authenticated, MsalAuthenticationTemplate will present a login form, provided by MSAL per OAuth standards, to be successfully completed before rendering. Otherwise, if they are already authenticated, then MsalAuthenticationTemplate will render the UI.
You’ll notice that interactionType prop is set to “Redirect”. The MSAL library gives you an option between a popup of the Microsoft login form, or a redirection to a new tab for the login form, to present to the user. Either way, completion of authentication form will return the user to the original react UI. With MSAL initiated and wrapped around our app, we now have access to all the utilities provided by the library for interacting with the Entra ID API. See docs for details.
After performing these actions, your React app will be ready for the standard authenticated experience.
- User attempts to view UI that is protected by MSAL wrappers and MSAL will check to see if user is authenticated
- If yes, then render protected UI
- If not, present login form. Upon successful authentication, user will be returned to React UI and view the authenticated UI.
Proper API Calls Utilizing JWT Tokens
We have already seen how the MSAL libraries enabled the React UI to render based on authentication, let’s now look at how the MSAL libraries applies authentication to API calls.
After authentication, Entra ID creates a session and provides a token to the client for use with protected APIs. We can see it applied directly to an API call using the following approach.

The above image illustrates import of the React component hook; the following image illustrates our call to acquireTokenSilent(options) to get the current session token from an MSAL-managed cache.
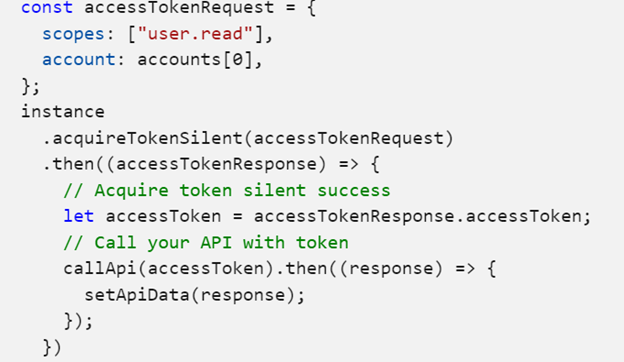
Under the hood MSAL uses multiple techniques to acquire a token so the developer doesn’t have to carry out the requisite mechanics. Here are details on the multi-layered approach MSAL uses to store, manage and refresh tokens for a smooth “silent” SSO experience: Acquiring Tokens and Caching.
Including this as part of the API request setup, or configuring it as middleware for requests, is much easier and leverages MSAL’s robust token management that trying to navigate the complex control flow of maintaining token freshness. So long as the current fresh token is attached to a request header `Authorization: Bearer {token}`, your MSAL enabled web application will be able to make requests to your protected API.
Configuring .Net Core API for MSAL
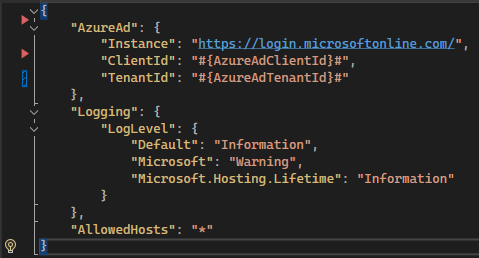
.Net Core is Mercury’s back-end enterprise framework of choice so our examples are written with a .Net Core orientation. To properly set up your .Net Core API to work with MSAL, you will need similar configuration values that were used to set up your React application. In .Net, this all starts with the appSettings.json file. This file stores all your configuration values that your API relies to function correctly. Within this file you will need to create a new section called AzureAd.
This new section will have the following properties:
- Instance refers to the specific Entra Id service that your organization uses. In this case it will be https://login.microsoftonline.com/.
- ClientId refers to a unique identifier assigned to each application that integrates with Entra Id. It serves to identify your application to Entra Id. This Client Id is used during the authentication process to ensure that only registered applications can request authentication tokens and access protected resources.
- TenantId refers to a unique identifier assigned to each organization or entity that uses Microsoft cloud services.
Token Verification and Implementation
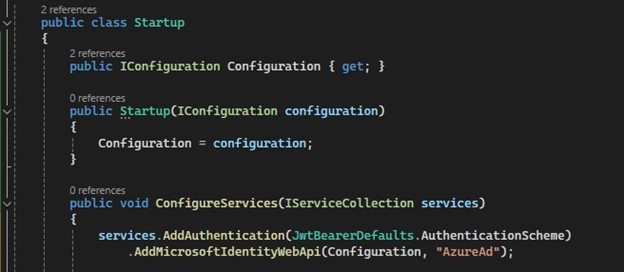
Code Initialization
Microsoft recommends use of the Microsoft.Identity.Web NuGet package when developing a web API with ASP.NET Core. Here is an example of initializing authentication and Microsoft Identity in ‘Startup.cs’.
Validate Tokens and User Claim Extraction
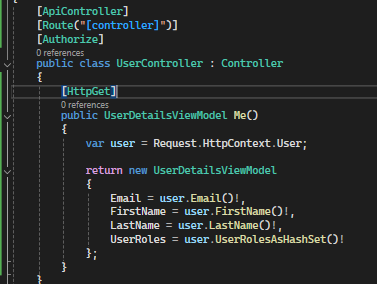
Token validation typically involves verifying the token’s signature, issuer, audience, expiration and other claims. MSAL usually handles token validation internally, but you may need to perform additional validation steps depending on the application’s requirements.
Once a user is authenticated and a JWT token is obtained using MSAL, you can extract user claims from the ‘HttpContext’ object. These claims are typically stored in the user’s identity.
The following code section illustrates how to extract user claims from the ‘HttpContext’:
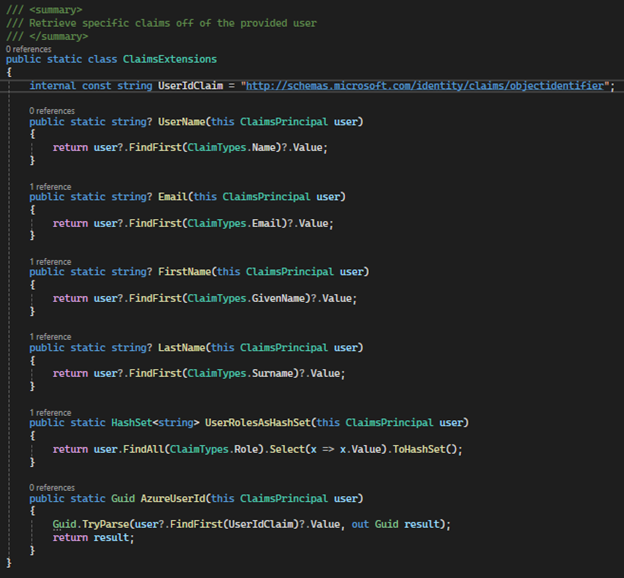
Engineering Pointer: make sure to handle cases where claims may be missing or null to avoid potential errors. Additionally, the specific claims available may depend on how the token was configured during authentication and the information provided by the identity provider.
Using the Authorize Attribute
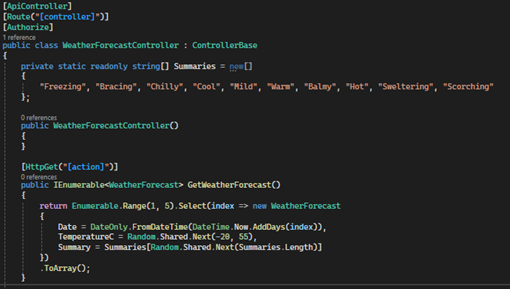
In ASP.NET Core, the Authorize attribute is used to restrict access to controllers or actions based on the authentication status of the user. It ensures that only authenticated users are allowed to access the decorated controller or action methods. If an unauthenticated user attempts to access a resource protected by the Authorize attribute, they will receive the 401 (Unauthorized) or 403 (Forbidden) status code.
In this example, the ‘Authorize’ attribute is applied to the ‘WeatherForecastController’ class. This means that all action methods within the ‘WeatherForecastController’ class are accessible only to authenticated users.
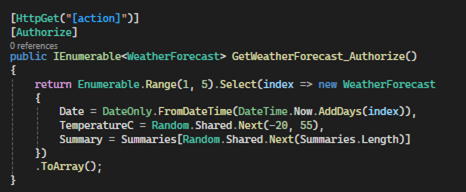
You can also apply the ‘Authorize’ attribute at the action method level to restrict access to specific actions.
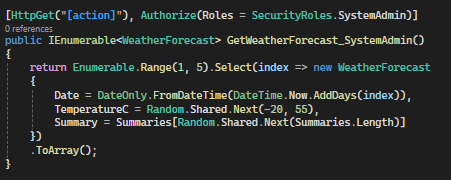
Roles
In this example, the ‘GetWeatherForecast_SystemAdmin’ method is restricted to users who belong to the ‘SystemAdmin’ role. If a user who is not in the ‘SystemAdmin’ role attempts to access this action, they will be denied access.
Policies
Using policies with the Authorize attribute allows for more fine-grained control over access to resources in ASP.NET Core. Policies are defined in the application’s startup configuration and can be based on various factors such as roles, claims, or custom requirements. Here’s an example of how to use policies:
Defined a policy in the ‘ConfigureServices’ method in the ‘Startup’ class:
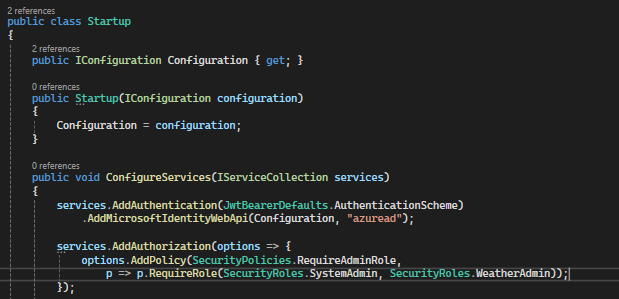
In this example, a policy named ‘RequireAdminRole’ is defined that requires users to have the ‘SystemAdmin’ or ‘WeatherAdmin’ role to access resources protected by this policy.
The policy can be applied using the Authorize attribute in the controller or action method
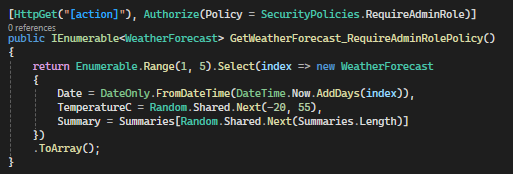
Now, the ‘GetWeatherForecast_RequireAdminRolePolicy’ action method is restricted to users who have the ‘SystemAdmin’ or ‘WeatherAdmin’ role, as specified by the ‘RequireAdminRole’ policy. More complex policies can be defined with custom requirements. For example, a policy can be created that requires users to have a specific claim.
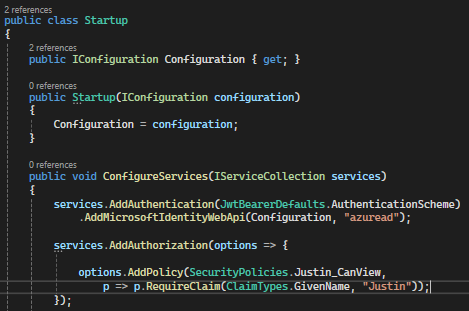
Once you have a custom policy created, you can apply this policy to a controller or action method using the same Authorize data attribute. The only difference here is that you would define the Policy with the name you created:

In this example, the ‘Justin_CanView’ policy requires users to have a ‘GivenName’ claim with the value of ‘Justin’ in their authentication token to access the resources protected by the action method.
Wrapping Up
There are several factors beyond application construction to ensure enterprise security, robust infrastructure and secure operational standards among them. However, even the most invulnerable infrastructure can be nullified by porous application-level practices – this is the stuff that SQL Injection and Cross-Site Scripting attacks are made of. To deploy and operate truly secure applications, we build security in from scratch – this blog post summarizes some of MercuryWorks’ approaches in an Azure, .Net Core and React ecosystem.