Power Platform Release Automation with Azure DevOps
This post is a combined effort of Susan Bell and Brenan GreenwoodTubbs, combining skills in Azure DevOps and Power Platform, respectively
Even as recently as a year ago, the release of Power Platform solutions has been a highly manual affair – it did not rely on any of the DevOps best practices we established for our full-code software development. With the advent of Solutions and Azure DevOps tooling, the Power Platform application lifecycle can be downright exhilarating.
Thanks to the partnership between the Power Platform and its trusty companion, Azure DevOps pipelines, our Power Platform release picture improves dramatically. Azure DevOps pipelines ensure each solution is perfectly suited for its new environment. In the event that a solution faces challenges when deployed to a higher environment, the pipeline’s source control integration can wind back the release and allow us to retrace our steps.
So, join us on this journey as we create, refine, and unveil Power Platform solutions that flourish in the digital universe, all while backed by the power of collaboration and automation.
Overview
Release Management is a systematic approach to efficiently delivering software and applications from development to production environments. It encompasses the processes, practices, and tools that enable teams to plan, coordinate, and execute the seamless deployment of software updates, new features, and bug fixes.
By adopting Release Management practices, we can ensure that software changes are thoroughly tested, validated, and properly staged before reaching end-users. This helps mitigate risks associated with software deployment, such as potential disruptions, downtime, or user-facing issues.
At MercuryWorks we use Azure DevOps pipelines as a release management tool for full-code solutions by creating a Power Platform release automation with Azure DevOps we can (1) reduce human-driven labor and errors, (2) increase the frequency of release and (3) present purpose-specific environments for each portion of application lifecycle management (ALM).
Unique to Power Platform, we also implemented our release automation to achieve the following tactical objectives:
- Introduce a formal record of Power Platform Solution release and associated outcome
- Enable a common set of metrics across full-code and low-code teams around frequency of builds and releases
- Add version control to Power Platform Solutions using a repository to record each built solution
In this post we will be looking at the overall workflow of our Power Platform Solution pipelines.
Knowledge Assumptions
This post is not intended to be an introduction on creating Power Platform Solutions or Azure DevOps pipelines. Parts of this post will mention but not go into details topics like –
- Creating Power Platform Solutions
- Basics of Azure DevOps yaml Pipelines (for an intro see this post)
- Basics of Version Control
First Time Setup
There are a few things that needed to be set up before the pipeline could be created and the team started benefiting from an automated process.
Azure Portal
Establishing an App Registration and generating a Client Secret are pivotal steps in configuring the authentication and authorization mechanism that facilitates seamless communication between Azure DevOps and the Power Platform. These components play a crucial role in establishing a secure and trusted connection between the Power Platform environments with application registrations in Azure (authorization), by enabling a smooth flow of information and actions while ensuring data integrity and access control to Azure DevOPs (authentication).
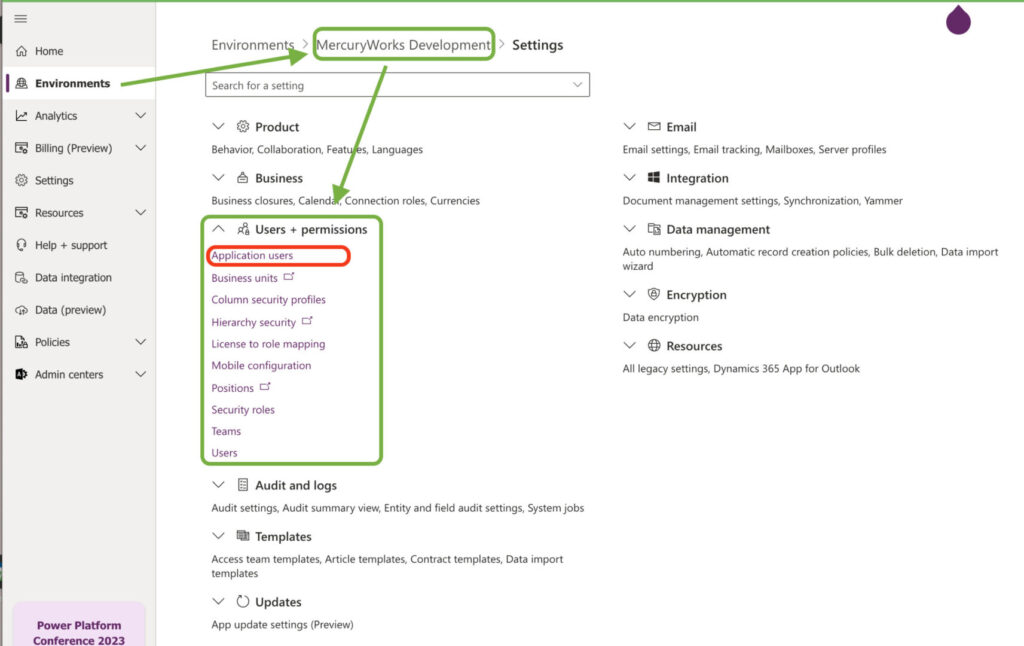
Power Platform Admin Center
Environments had to be created and permissions assigned for Azure DevOps to be able to deploy the solution. We use a three-environment setup. Implementing distinct environments within Power Platform offers a resilient framework for managing solutions. The development environment fosters the creation of new features using test and development data sources, safeguarding the integrity of production data. In contrast, the sandbox environment facilitates edits to solution components linked to production data, enabling the deployment of swift “hot fixes” to the live environment.
Furthermore, the production environment employs ‘Managed’ solutions, ensuring that modifications are restricted solely to the connections within the solution. This strategic measure locks down the solution, preventing unintended changes to live automations and applications, thus maintaining the stability and reliability of our production environment.
Environments
Development
- Unmanaged solution
- Connected to test data
Staging
- Unmanaged solution
- Connected to real data
Production
- Managed solution
- Connected to real data
Permissions
These permissions are set on each environment.
- The App Registration created earlier in the process is an App User in the environment.
- Security Roles
- AIB Roles
- Basic User
- System customizer (an environment-level role that grants access to import and export solutions)
Power Platform Solutions
All components must be part of a solution. Solutions allow for connection references and environment variables unique to each environment. This solution is initially created in the Development environment.
Azure DevOps Extension
The Power Platform Build Tools from the Marketplace have all of the tasks used in this pipeline, and many others related to Power Platform.

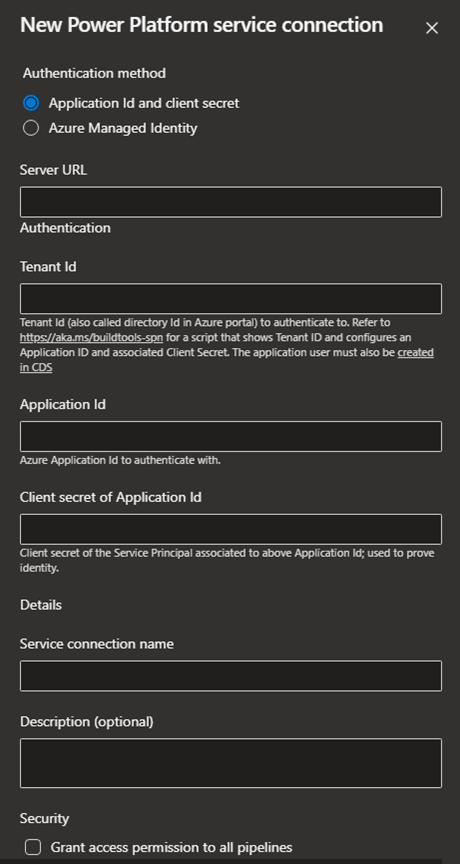
Azure DevOps Service Connection
Each Power Platform Environment has a Service Connection. Details used in this are from the App Registration created previously and the Environment URL.
Repository
We use a two-branch repository system, with a dev and main branch, and a git flow like process. We’ve implemented a designated folder structure within our Power Solution repositories.
- pipeline – contains the pipeline yaml and templates
- scripts – contains PowerShell or other scripts needed in the pipeline
- src – contains the unpacked solution that was exported from the Development environment
- environmentsettings.json – exported connection settings for the solution (see below)
- The zip files are previously exported solutions, but they are excluded using .gitignore

Variables
It is possible to create a file with all the solution’s environment variables and connection references. This allows for setting specific values when deploying to each environment.
The Power Platform CLI is required to complete the process.
- Export solution from the Power Platform portal
- Run create-settings command for a JSON file of all connection references and environment variables.
pac solution create-settings --solution-zip <solution_zip_file_path> --settings-file <settings_file_name>- Replace values and ConnectionId values with Tokens (Our format is #{TOKEN}#)
- Create Variable Group in Azure DevOps for each environment and add variables for each of the tokens in the file.
We utilize the Replace Tokens task in the pipeline during each environment stage to update the token with the environment specific values from the Variable Library
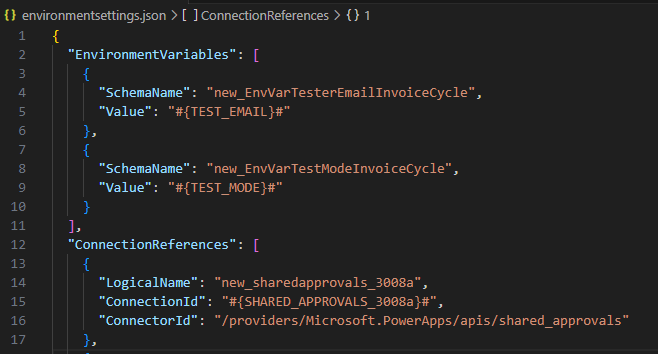
This is an exception to the single time setup. As the solution is being developed, these references and variables may change over time. Each time a reference or environment variable is added or deleted this file will need to be updated. Each time a value changes, the Variable Group Library will need to be updated.
Workflow: Deploying to Staging
Developer Workflow
In traditional MercuryWorks operating procedures, the developer creates the initial solution and does all the work in the lower (typically “Development”) environment.
When a feature is complete, and the solution is ready to deploy to Staging. The developer:
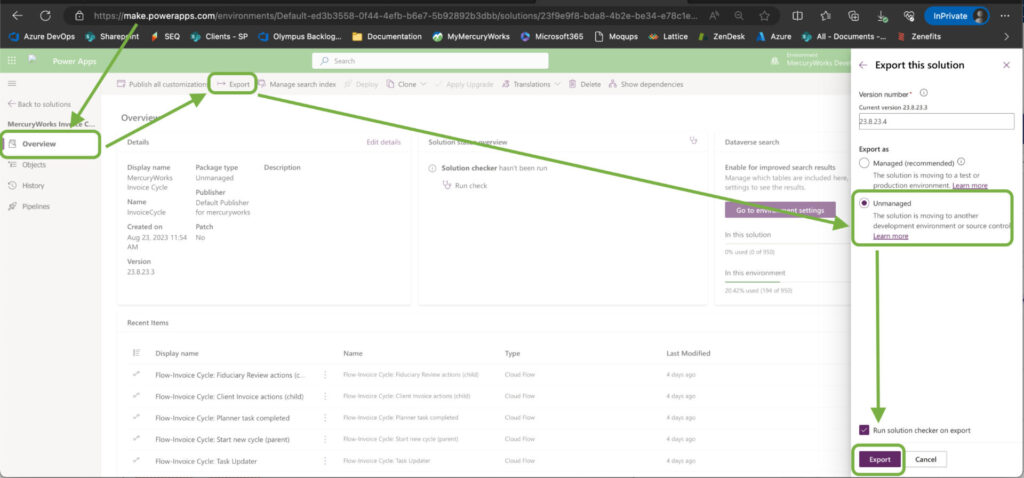
- Exports the solution as Unmanaged
- It is essential to make the solution as “unmanaged” before exporting – it is not possible to proceed with a “managed” export.
- Unpack the solution to the src folder in the repository
- This will require the Power Platform CLI to be installed
pac solution unpack --zipfile <solution zip file> --folder <destination folder> --allowDelete --allowWrite –clobber- If the solution’s connections or environment variables were changed, follow the previously outlined steps to (re)create the environmentsettings.json file and update the Variable Groups as necessary
- Create a feature branch and submit a Pull Request to the dev branch
Pipeline
Once the Pull Request is merged to dev a standard MercuryWorks Power Platform pipeline will kick off, running some checks and triggering a deployment to the Staging environment.
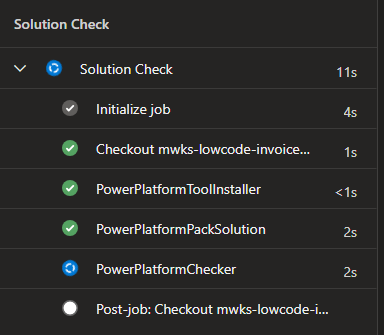
Stage: Solution Check
This stage is a verification process and required for general pipeline structure. It will run as a check on Pull Requests and the first stage to run when a PR is merged to dev.
Steps:
- Checkout repository
- Install Power Platform tools
- Pack Solution
- Power Platform Checker
Note: some of the tasks seen below are ones auto-generated by Azure Pipelines for initialization and cleanup.
Check: Approval
Once the Solution Check stage has been completed, an approval email is sent out before deploying to Staging. Many times, Staging is used for demo-ing, and we want to make sure that it only gets overwritten when appropriate.
Stage: Staging Deployment
Once the Approval has been reviewed then the stage to deploy the solution to Staging will run. This stage will only run if the pipeline was triggered from the dev branch.
Steps:
- Checkout repository
- Generate Version Number based on build number
- We version our application and solutions based on the build number of the pipeline (YY.M.DD.Rev) so we can easily compare which release it was tied to and roll back to a previous version if necessary.
- Install Power Platform tools
- Pack Solution
- Replace tokens in environmentsettings.json
- Import solution to Staging environment
- The environmentsettings.json file is set as the DeploymentSettingsFile to set each of the connection references and variables
- Update Version using build number
- This task updates the Version of the solution after it has been imported
- Tag commit history with build number
Note: some tasks seen below are ones auto generated by Azure Pipelines for initialization and cleanup.
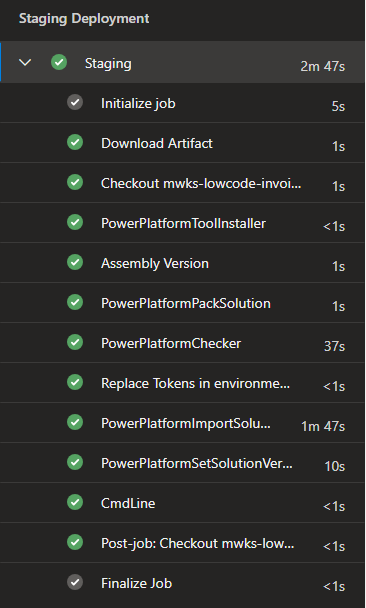
Once the stage is complete, the Solution has been deployed to the Staging environment and ready to be reviewed. Any changes from testing will be made in the Development environment and this process will be repeated until it is ready to be deployed to Production.
Workflow: Deploying to Production
Developer Workflow
After the solution has been verified in Staging and a release day set, it is time to go through the process to deploy to production.
The developer will
- Create a release branch based off of the dev branch
- Create a Pull Request to the main branch from the release branch
Pipeline
Stage: Solution Check
This is the same solution check stage as previously discussed. It is run here for the solution check and for requirements for Azure Pipelines.
Check: Approval
Once the Solution Check stage has been completed, an approval email is sent out before deploying to Production. The release branch and PR can be completed ahead of time, so the only action needed for the time of release is the approval and verification.
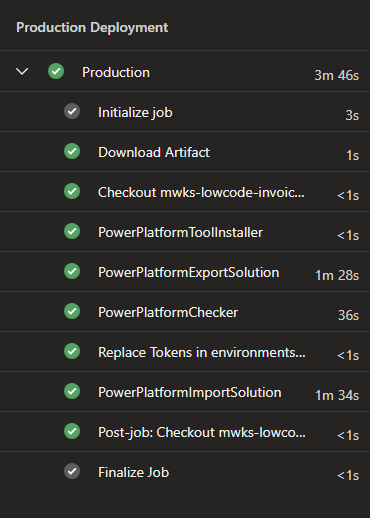
Stage: Production
Once the Approval has been reviewed then the stage to deploy the solution to Production will run. This stage will only run if the pipeline was triggered from the main branch.
Steps:
- Export solution from Staging as a Managed Solution
- In order to import the solution as managed, it must be exported as a managed solution
- Power Platform Checker
- Replace tokens in environment settings JSON
- Import solution to Production environment
You will notice that the versioning steps are not included here – the version can only be set on an unmanaged solution.
Note: some tasks seen below are ones auto generated by Azure Pipelines for initialization and cleanup.
Wrap Up
In essence, the combined use of Power Platform and Azure DevOps Pipelines offers a holistic approach to application development and deployment. It optimizes processes, promotes collaboration and ensures the delivery of high-quality solutions efficiently and reliably. The implementation of a comprehensive automated release process has allowed our teams to channel their efforts toward crafting elegant solutions, free from the distractions posed by manual releases and the risk of potential errors.
Additional Resources
Power Platform CLI
Create Deployment Settings File
- https://benediktbergmann.eu/2021/12/02/set-connection-references-and-environment-variables-in-pipelines/
- https://learn.microsoft.com/en-us/power-platform/alm/conn-ref-env-variables-build-tools#deployment-settings-file
- https://learn.microsoft.com/en-us/power-platform/guidance/alm-accelerator/setup-data-deployment-configuration
Power Platform Build Tools
Power Platform Solutions
Power Platform Environment Administration
Creating an Azure Pipeline
Interested In Our Power Platform Services?
"*" indicates required fields