Enhance your Azure DevOps Pipeline
In a previous post we built a full Azure DevOps multi-stage pipeline in yaml. For our little project, this is a complete pipeline and it could just be called done here. However, there are always things to improve and learn. In this post I’ll introduce a couple concepts that can be used to enhance the pipeline and help with the security, simplicity and reusability.
At the end of this post we will have some variable groups set up to prevent from checking in secure information into source control. We will also utilize templates to reduce the number of lines in the base pipeline and allow for reusability of sections of the code.
Requirements to follow along
- Azure Subscription – Sign up for a free account
- Azure DevOps Account – Sign up for a free account
- Repository – Any Git repository can be used and connected to Azure Pipelines but this walkthrough will utilize Azure Repos Git repository
- IDE – This walkthrough was created using Visual Studio Code which has extensions for Pipeline syntax highlighting
Base project
We will be continuing with the .Net Core API project and pipeline that have been used through the series. You can follow along in the first two posts and then pick up from there or grab the code from the branch ‘post2-release’ as a starting point for this post (Github Post2 Release Code). It is not necessary to have previous knowledge of .Net Core for this walkthrough; the concepts of creating the Pipeline are universal between all supported languages.
Series Outline
Check out all of the posts in this series.
- Intro and setting up the build steps
- Deployment steps, environments and approvals
- Pipeline templates and variables (this post)
Variable Groups
All the way back in the first post in the series I did a quick introduction to variables. These are similar to variables you see elsewhere – aliases for a piece of data that will be used in multiple places. When this data needs to be changed then it will only need to be update in one place.

The in-code variables are very useful and should be utilized, however they may not be appropriate in all scenarios. What about times where the variable data needs to change depending on the environment being deployed to, or if this data is something that should not be kept in source control like a password or secret key?
If this data needs to change based on the environment then it is certainly possible to create a variable per environment but then the code will have un-needed repetition (eg. variables named devSetting and prodSetting).
A solution to this is to use variable groups available in Azure DevOps. Variable groups allow you to create a collection of variables that can be used in your pipeline. A group can be created for each environment or some other grouping and can even be shared across multiple pipelines.
The pipeline we are working with doesn’t have any specific places where this will be needed but let’s create a couple variable groups so we can see how they work.
In Azure DevOps under Pipelines, select Library to access where to create Variable groups. Select the button in the middle (+ Variable group) to create our first group.

On the Variable group creation page there are a variety of things to set.

First, we always want to make sure that they are appropriately named and given a detailed description.
The first toggle is to allow access to this variable group to all pipelines. Keep this toggled on for now, but in the resources section I have a link that describes how to only allow access for a single pipeline.
The next toggle is to allow for linking secrets from Azure Key Vault. You will be asked to connect to a subscription and enter a Key Vault name. Right now that is out of scope for this post so we will leave it toggled off.
The last thing to add are the actual variable Names and Values. Keep the names short but descriptive and remember that these names could be used across multiple environments so don’t get too specific.
It’s a secret
One last thing to note is the second variable here, named Secret, I actually don’t want the value to show in the logs or for others to see it on the screen. To achieve this we will click the lock to the right of the row.


Before saving, it changes the value to a collection of asterisks and you can toggle between this and plain text. However, after saving with the variable set as a secret you will no longer be able to view what the value was.
After changing the Secret variable to a secret, click Save at the top.
Production Variables
We want to have a variable group with the same variables for production. Luckily there is a Clone button next to the Save button. Click this and update the name, description and Readme variables.
Notice that the Secret variable has an error – variables marked as secret are not automatically copied. The Value for the variable named Secret will need to be re-entered.

You should now have two Variable groups

Pipeline Integration
Now that we have these variables in Azure DevOps, lets utilize them in our pipeline. Two additions have been made to this snippet of the staging deploy section.
variables (line 7 – 8): The variables property, similar to the global variables property towards the top of the pipeline will allow you to specify key/value variables. The variables in this section will be scoped only to this stage. There is a special option for this property – group where we can specify the name of the Variable group we created above.
script (line 21 – 23): Like I mentioned previously this pipeline doesn’t meet the scenarios I mentioned above to utilize Variable groups. To demonstrate the concept though, we will add a script block to print out each variable.
Be sure to make this update in both the Staging and Production deployment stages, and that the Production stage is pointing to the correct variable group. Then push your changes to the repository and review the logs.
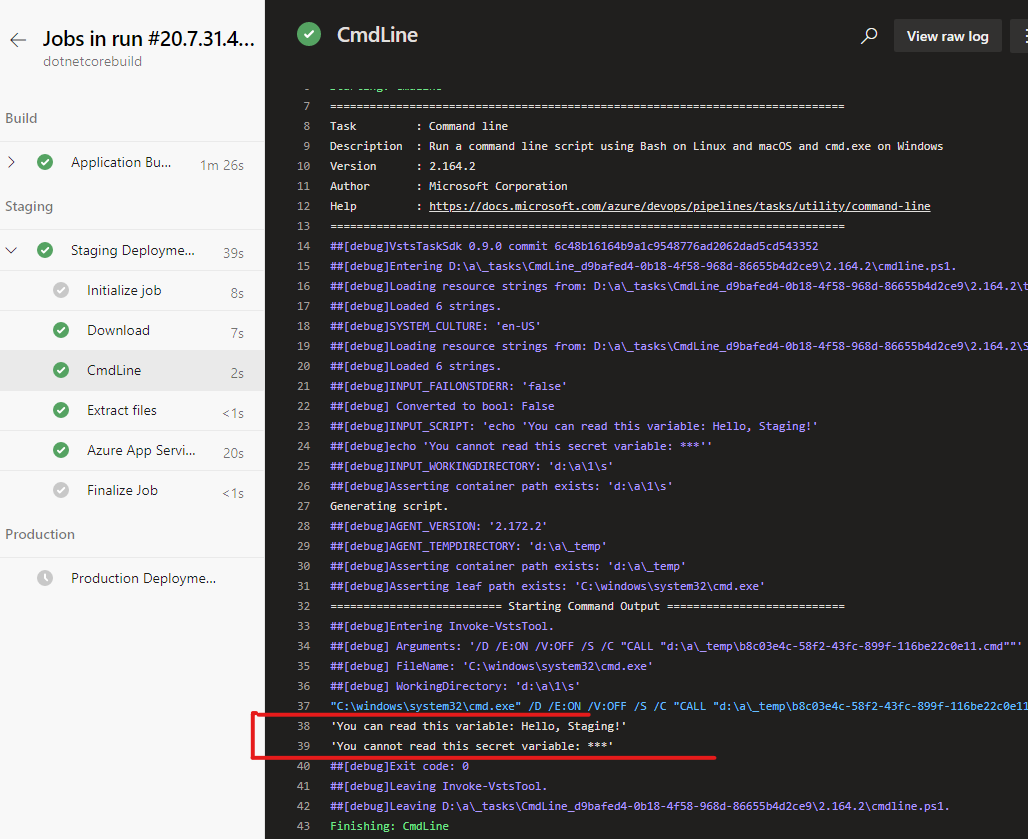
The script stage will default to the name CmdLine if you do not give it a specific name. Notice that in the output the variable that we marked as secret did not print out the value? This is how we would want to handle variables that contain sensitive information.
When running the Production step then you will see the same output, except with the values set for the production variable group. The full pipeline with variable groups set in both staging and production can be found here.
Templates
This next concept does not require variable groups to be implemented. If you are following along, the examples shown will include the updates from the variable groups section but it is possible to start from the base project of this post.
From my developer experience I have often heard the acronym DRY (Don’t repeat yourself) and been taught about abstracting pieces of code that are replicated. This helps keep things uniform and, similar to using variables, prevents needing to make updates in multiple places. In multi-stage pipelines we have the ability to create templates which allows you to take a section of the pipeline and make it a reusable part. If you have worked with the graphical build or release in Azure DevOps the related feature is Task Groups.
Take a look at the pipeline we are working on now. Notice that the exact same steps are being used in the Staging and Production stages – the only difference between them is the value for WebAppName (Lines 78 – 97 and 114 – 133 GitHub Code). We would like to make these steps the standard way to deploy this application and don’t want to have them repeated in the pipeline so we will pull out this section into a template.
Let’s create a new folder named templates under deployment to hold our templates and create a file named appdeployment.yml

To start our template, copy the steps from the full pipeline, which will include the download, script, Extract files task, and AzureRmWebAppDeployment task. You will need to start the template with the steps property for context on what is in the template.