Consolidated Billing for an AWS Organization
Multiple Account Strategy, Cross-Account IAM Roles, and Role Switching– Part three of three in this AWS series
One of the major concerns by account owners looking to expand their AWS operations by creating individual accounts for specific uses is billing management. Having 4, 6, 12, or even more accounts with individual invoices, billing methods, support contracts, reserved instance pools, and everything else that comes along would be enough to drive anyone crazy. Luckily, AWS offers a great solution that is easy to set up and manage.
AWS organizations can be used to set up a single account as the “master” account, with all of the billing, support, and reservations managed in one place. One single bill, with all of the costs of each account broken down any way you choose. That’s what this post is all about.
Billing Strategies
First, let’s look at the different ways you may choose to use multiple accounts and the benefits of each method.
Environment-based accounts
One way an organization may choose to separate their accounts is based on the environment type. Accounts may be listed as company-dev, company-stg, company-prod, company-internal and have little to no interaction or shared resources between the accounts. This gives you the utmost physical separation between your production environment and the others. If stray calls from development and staging environments being able to directly affect prod are a concern, this method will do the most to prevent that. One immediate repercussion, though, is that this method will also force you to use multiple credential profiles in whatever CI/CD you utilize or require you to create trusts between accounts if you choose to use AWS Ops.
Project or Application based accounts
Another method for separation would be to base accounts on the application or project which would live in the account. If your company hosts or develops multiple products, this method would allow you to maintain a separate account for each product, with production, development, and staging environments maintained within their own VPCs in the product account. This method would allow you to use a single credential profile in your CI/CD application to streamline deployments for the product, while also centralizing logging in CloudWatch on a per-application basis. Proper environment separation is provided by VPCs and Security Groups, which allow granular control over what each resource can talk to.
User-based accounts
Another option I’ve seen used widely is user-based accounts. Each developer, DevOps engineer, and solutions architect would be given their own account to use as a sort of scratch space. These accounts would be used in place of a local development environment. This allows engineers and developers to write code exactly the same way they will for staging and production – right down to the pipelines and Infrastructure As Code scripts – and test them in a cloned environment. While this may lead to maintaining a lot of accounts, thanks to the benefits provided by AWS Organizations it really isn’t that much work. Generally, this is used alongside the AWS Well Architected Framework and one of the other methods mentioned above.
Tagging for Billing
A key factor in maintaining multiple accounts is having the utmost visibility possible in billing reports. Having one consolidated bill, without visibility in what each environment, application, product, or user cost individually would be an accounts payable fiasco. There’s an easy solution to this problem, though, using the built-in Tags feature on nearly every offering from Amazon.
Tags are a JSON based key-value pairing that can be added to resources and used in many ways. When using tags for billing, it is best to create a pair that will easily help identify a resource and its associated costs. For example, an ideal tag to use may be “Environment” – having Dev, Staging, and Prod environment values easily defined will help determine the cost of each set of resources. Another option would be “Application Name” or “Service Name” if you have several billable applications running under the same organization. Used in conjunction with Environment, it would allow you to have an overview of the cost for each application per environment, all on one report regardless of whether they’re in separate accounts. Perhaps, if your organization provides every user with a sandbox environment, having a tag for the User would be appropriate. The below example, from an Amazon guide, shows a billing report broken down by a tag Cost Center, and further broken down by resource names Widget 1 and Widget 2.
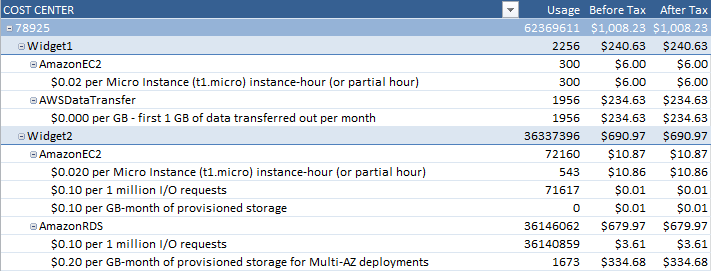
Costs are accumulated and displayed for every resource, as well as the Widget level and the Cost Center level. This is just one of the numerous ways you can use tags to generate billing reports that are meaningful to your organization.
A Few Extra Tips
When considering top-down organizational billing, there are lots of extra benefits that you may not be aware of. Two of my favorite little secrets revolve around Reserved Instances. For those that are not aware, Reserved Instances are an AWS offering that allows you to pay an often drastically lower price-per-hour for a resource within a particular Availability Zone if you commit to paying for all of the hours for that resource in either a 1 or 3 year term. Essentially, you’ll get a huge discount for signing a contract for resources. Now, on to the tips!
Tip #1 – Sign all RIs on the master account
For those with multiple accounts within an organization that would all benefit from Reserved Instances, a simple yet less known tip is to consolidate ALL Reserved Instance contracts under the Master account. This allows you to move RI resources between accounts as desired or needed by the organization.
Tip #2 – Purchase the smallest resource size
AWS Reserved Instances utilize what is referred to as a Normalization Factor – that is, each resource has a normalization factor equivalent to the instance size. The below chart shows how each instance scales based on normalization.
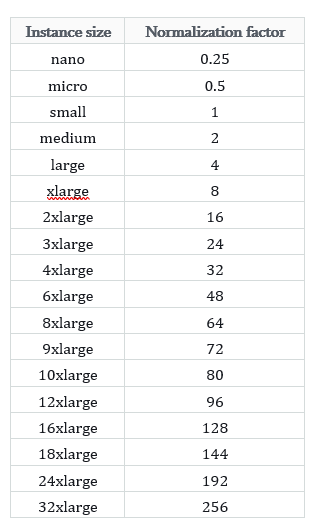
The most effective way to purchase Reserved Instances, in my opinion, is to calculate the resources you need based on the Normalization chart and purchase all Reserved Instance resources at the Small scale. For instance, if you want to run 4 M5.Large reserved instances in one availability zone, you would purchase 16 Small reservations.
The formula for this is (Instance Count * Normalization Factor) = Number of Small instances to request
4 x 4 = 16 Small instances
This allows you to scale your instances up or down, as needed, without concern for your RI requirements. Say you estimate that you need 2 m5.Large instances each for both an API server and a web server. Now let’s pretend that the API instances continually runs at 10-15% utilization, while the Web instances runs at 85-90% and higher. With utilization that low, the API instances can most likely be scaled down to Small instances, and the Web instances can be scaled up to XLarge instances.
Purchasing all of your RI reservations at the Small level gives you the flexibility to scale this way without concern for whether you’ll still fill the M5.Large instance allocation you’ve got reserved.
That’s it for this series of AWS posts! Hopefully you found them enjoyable and informative.
Miss a post in the series, check them out here:
- Part One: Leveraging Multiple Accounts in your AWS enviroment
- Part Two: A Deep Dive into Cross Account IAM Authentication
References