Powershell, VSO Rest API and vNext Builds
In this post I am going to be showing a simple example of using the Visual Studio Online REST API to retrieve information about a build using PowerShell. Then we’ll take a look at how we can use the information we retrieved in a vNext build step. I am assuming at least some basic understanding of builds, Visual Studio Online and PowerShell.
vNext Builds
The new builds in VSO allow for easy customization of the build pipeline. You can add and rearrange steps to create a process that works best for your application. For this post I will be adding a few steps for demonstration but will not be going into much detail on all of them.
First, I created a simple console application and added it to a Git repository in my VSO account (you can get one for free at http://www.visualstudio.com). The only code I added to the Main method is a simple try/catch that will come into play later.
<code>
try  {
           Console.Write("Hello, world!");
       }
catch (Exception ex)
      {
           Console.Write("There was an error!");
      }
</code>
In VSO go to the Build tab and select the green plus symbol to add a new build definition. Start with an Empty definition.
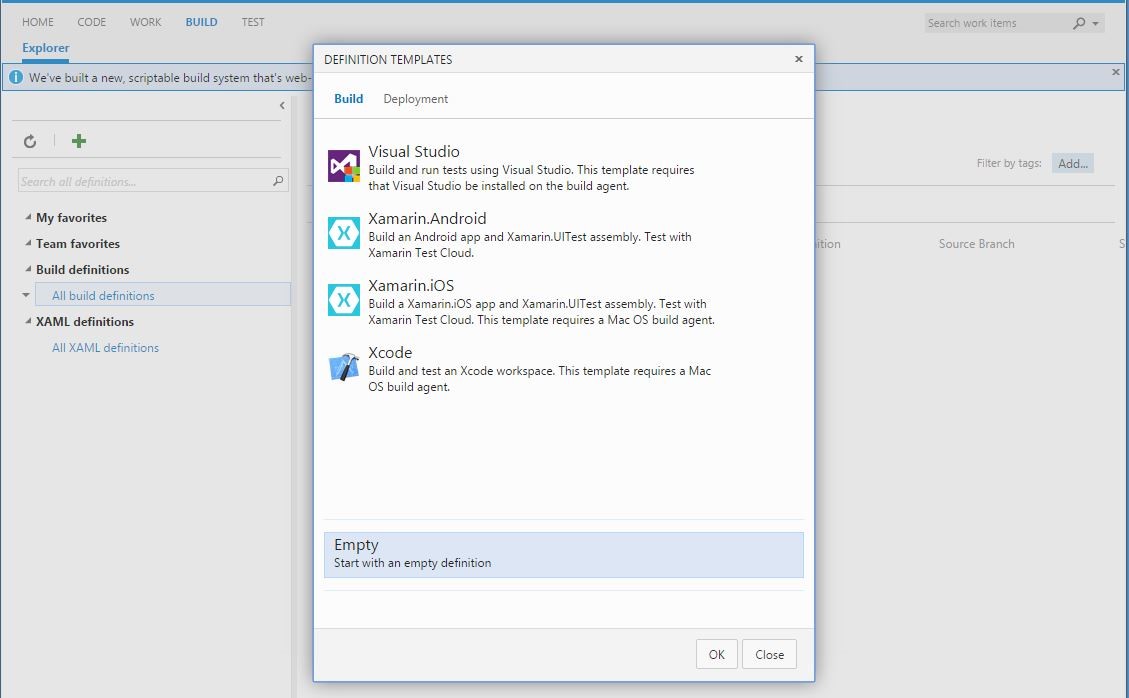
After selecting ‘OK’ you will be taken to the Completed builds screen which is, of course, empty because we have not queued a build. It defaulted the name of the new definition to “New Empty definition”. Select the Edit link next to the name. On this screen you will see many options for customizing your build.
Select the Repository tab and select the repository and branch you will use for the build. Mine is a Git repository, the name is BuildPipeline and I want to use the master branch.
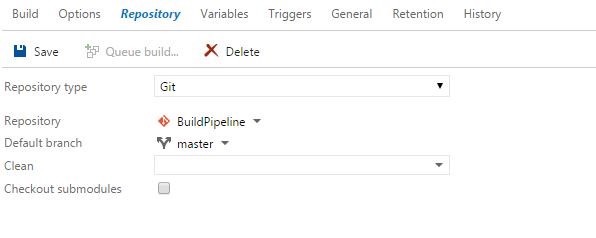
Hit the Save button and you will be prompted to change the name and enter a comment. You will be prompted with this on every save and selecting the History navigation item you can view all of the changes made to the build definition.
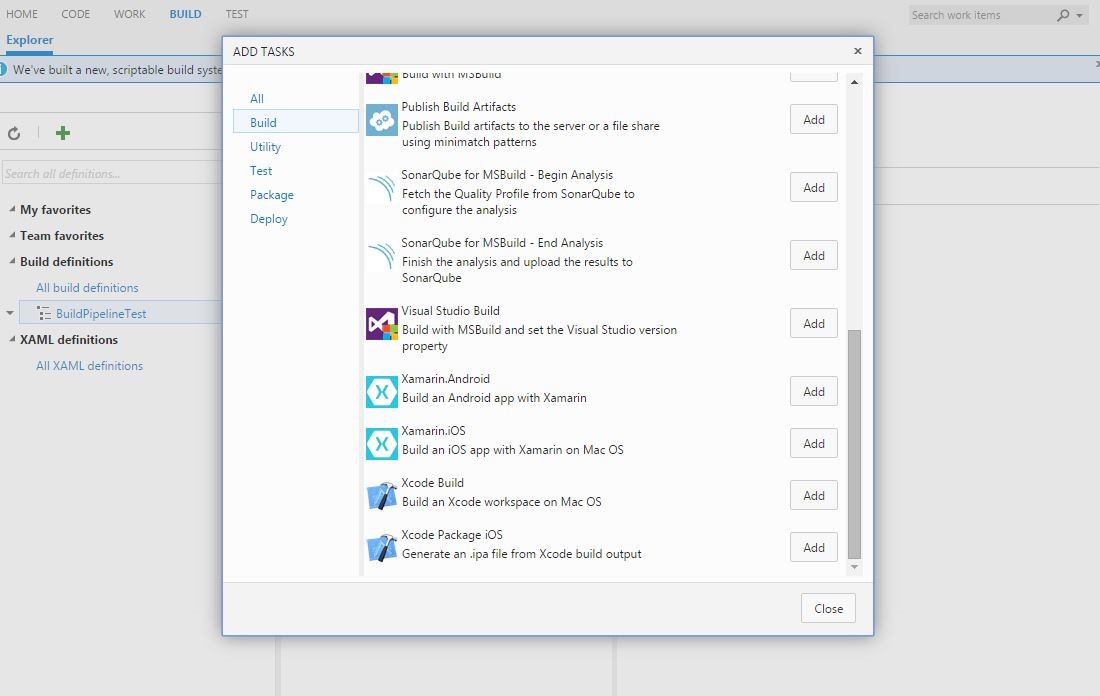
Back in the Build tab let’s add our first build step (On the modal that comes up it says “Add Tasks” – task and step are used interchangeably). Select Add next to “Visual Studio Build”. It will add the step but you will need to close the modal to return to the Build screen.
Set the name for this step to “Compile” and browse for the solution of your project you want built in this step.
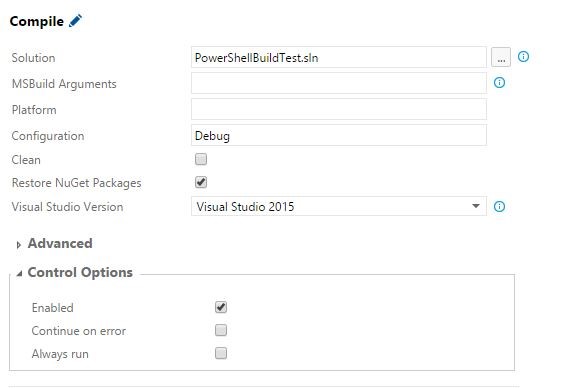
Save your updates and then queue a build.
One last thing to note – select the Variables navigation item and copy the Value for the system.definitionId somewhere. We will need this later.
Now we’ll step out of VSO for a while and take a look at the REST API.
Visual Studio Online REST API & PowerShell
Last year Microsoft released a new API for accessing Visual Studio Online. Using the REST API you can access pretty much anything in VSO – task boards, git commits, project and teams. You can review all of the services available here –https://www.visualstudio.com/en-us/integrate/api/overview.
This post will be focusing on the service for Builds using version 2.0 of the API.
The first URL we will look at is the list of all builds for the build definition we created previously (https://www.visualstudio.com/integrate/api/build/builds#Getalistofbuilds). The parameters I will use are definitions and $top (the api-version parameter is required in all calls). So our URL will look like this:
<code>
https://{account}.visualstudio.com/defaultcollection/{project}/_apis/build/builds?api-version{version}&definitions={definitionId}&$top={int}
</code>
In our PowerShell script we can create a handful of variables to help us out.
<code>
$projectName = "" #Project name in VSO - can be found in the top left header when looking at builds
$account = "" #Your account name
$username = "" #Alternate credentials username
$password = "" #Alternate credentials password
$definition = "" #definition Id(s) found in the Variables tab of a build definition
$apiVersion = "2.0"
$tfsUrl = 'https://' + $account + '.visualstudio.com/defaultcollection/' + $projectName   #Base url for all of the VSO API calls
</code>
Accessing the VSO API through PowerShell requires Alternate Credentials set up. I found the following post helpful for the syntax on the headers needed for credentials. It also has some links to information on Alternate Credentials if you do not have them set up.
<code>
$basicAuth = ("{0}:{1}" -f $username,$password)
$basicAuth = [System.Text.Encoding]::UTF8.GetBytes($basicAuth)
$basicAuth = [System.Convert]::ToBase64String($basicAuth)
$headers = @{Authorization=("Basic {0}" -f $basicAuth)}
</code>
Now we’ll put some of the variables together and create the full url to get the most recent build and call it. For the $top parameter I am specifying 1 to only get the most recent build queued.
<code>
[uri] $uri = $tfsUrl + "/_apis/build/builds?api-version=" + $apiVersion + "&definitions=" + $definition + "&`$top=1"
$allBuildDefs = Invoke-RestMethod -Uri $uri -Headers $headers -Method Get
</code>
To review the Json that gets returned, send it out to a text file.
<code>
$allbuildDefs | ConvertTo-Json | Out-File -FilePath ‘d:\topBuildDefinition.txt’ -Force
</code>
There is some interesting information about the build in this data but what we are looking for is the buildNumber so we can start digging deeper into the build details.
The next call to the VSO API we will look at is the Build Details (https://www.visualstudio.com/integrate/api/build/builds#Getbuilddetails).
<code>
https://{account}.visualstudio.com/defaultcollection/{project}/_apis/build/builds/{buildid}/timeline?api-version={version}
</code>
Notice in the URL it ends with the build id and /timeline. This will not only get us general details about the build but also each of the steps that were completed in the build definition.
We will save the buildNumber to a variable and use it in building out the next URL. The build number is found inside the value array.
<code>
$buildNumber = ($allbuildDefs.value).buildNumber
[uri] $uri = $tfsUrl + "/_apis/build/builds/" + $buildNumber + "/timeline?api-version=" + $apiVersion
$currentBuild = (Invoke-RestMethod -Uri $uri -Headers $headers -Method Get)
$currentBuild | ConvertTo-Json | Out-File -FilePath ‘d:\buildDetails.txt’ -Force
</code>
This gets us even more interesting information about the build. We can see the status of each task/step and the progress of it, the number of warnings from the task and even urls to the log files that were generated.
Now we can take this information and start using it to customize our build process even more. For example, if there are certain steps that we want to make sure don’t exceed a set number of warnings, we can fail the build.
Let’s try it out.
PowerShell and vNext Builds
We will need to make a few changes to our script before we can use it in the build definition.
First, the script should be reusable so we will want to add a couple of parameters, one for the specific step to look at and the maximum number of warnings allowed.
<code>
Param(
[string]$maxWarnings,
[string]$taskName)
</code>
Next, instead of having to get the most recent build (which would get the one executing the script) VSO has some environment variables that can be used (https://msdn.microsoft.com/en-us/library/hh850448.aspx) and one is for the build number of the currently running build. It is very helpful to use these environment variables because it results in less code and one less call to the API.
<code>
$buildNumber = $env:BUILD_BUILDNUMBER
</code>
Now let’s get the number of warnings that were generated for the specified Task in the current build. In the JSON returned for the current build it has a record object that holds an array of the tasks. We will select the object in the array where the Name value equals the TaskName parameter. From that object we want to get the warningCount value
<code>
$warningCount = $currentBuild.records | Where { $_.name -eq $TaskName } | select warningCount
</code>
We also want to make sure to fail the build if the number of warnings in the step we are looking at is more than the max number of warnings that were passed in. A simple If statement with a descriptive error can take care of this. To fail the build we just exit the script with a status that is not 0.
<code>
IF ($warningCount.warningCount -gt $maxWarnings)
{
    Write-Error("The number of  warnings (" + $warningCount.warningCount + ") exceeds the number of allowed warnings (" + $maxWarnings + ")")
    exit 1
}
</code>
Below is the full script. I also added in a couple Write-Verbose statements to print out the number of warnings and the max number of warnings that was passed in to the console.
<code>
Param(
[string]$maxWarnings,
[string]$taskName )
$account = "YourAccountName"
$username = "YourUsername"
$password = "YourPassword"
$projectName ="YourProjectName"
$definition = YourDefinitionId
$apiVersion = "2.0"
$buildNumber = $env:BUILD_BUILDNUMBER
$tfsUrl = 'https://' + $account + '.visualstudio.com/defaultcollection/' + $projectName
$basicAuth = ("{0}:{1}" -f $username,$password)
$basicAuth = [System.Text.Encoding]::UTF8.GetBytes($basicAuth)
$basicAuth = [System.Convert]::ToBase64String($basicAuth)
$headers = @{Authorization=("Basic {0}" -f $basicAuth)}
[uri] $uri = $tfsUrl + "/_apis/build/builds/" + $buildNumber + "/timeline?api-version=" + $apiVersion
$currentBuild = (Invoke-RestMethod -Uri $uri -Headers $headers -Method Get)
$warningCount = $currentBuild.records | Where { $_.name -eq $TaskName } | select warningCount
Write-Verbose ("Warnings: " + $warningCount.warningCount) -Verbose
Write-Verbose ("Max warnings allowed: " + $maxWarnings) -Verbose
IF ($warningCount.warningCount -gt $maxWarnings)
{
    Write-Error("The number of  warnings (" + $warningCount.warningCount + ") exceeds the number of allowed warnings (" + $maxWarnings + ")")
    exit 1
}
</code>
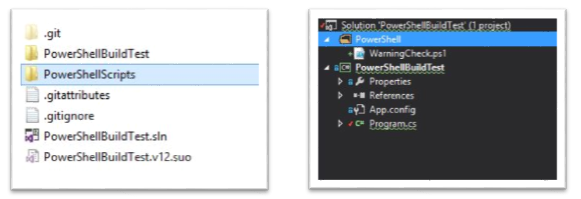
Save the PowerShell script and add it to your Visual Studio project. I added a new PowerShell folder to the file structure in File Explorer to hold the script. In my solution, I added a new Solution Folder and then added the script using Add > Existing Item. Make sure to sync the changes to the project’s Git repository.
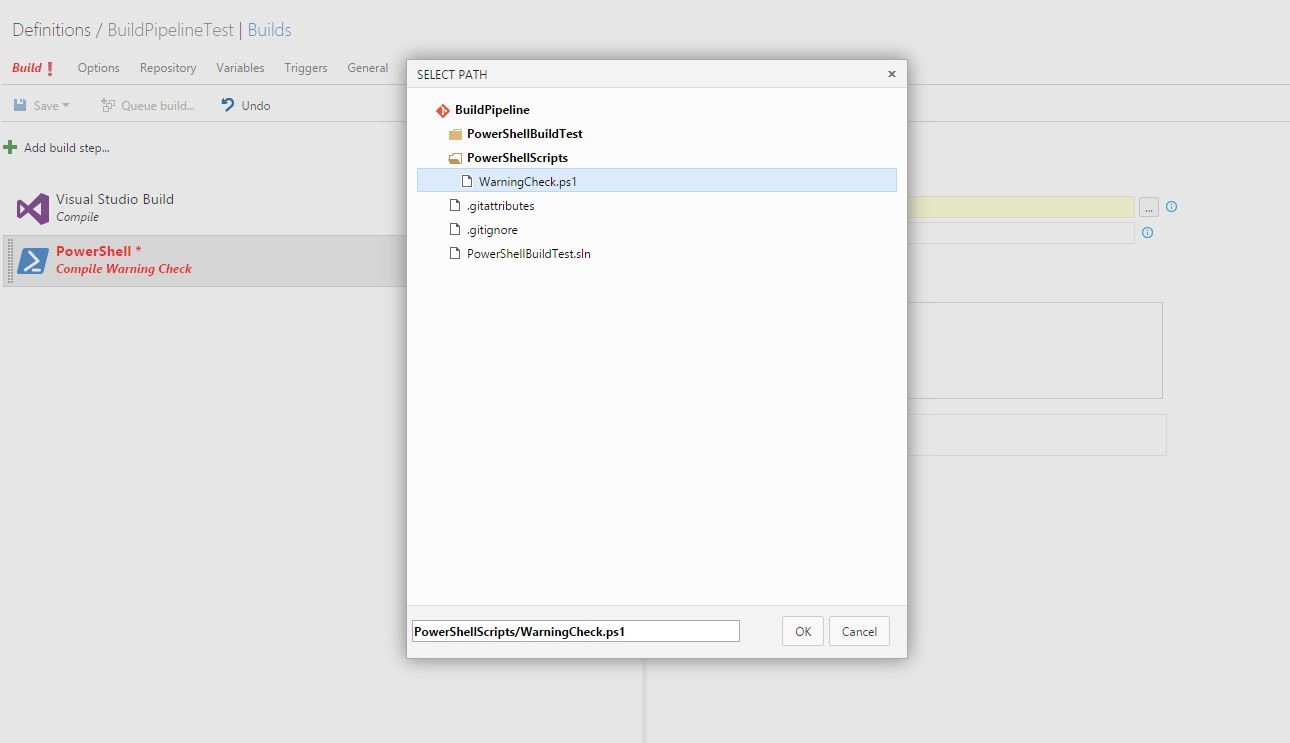
Back in VSO lets add a new step to the build definition we created earlier. This time go to the Utility group and add PowerShell. Make sure it comes after the Compile step already there and give it a more meaningful name. I gave it the name Compile Warning Check. For the Script file name, selecting the browse (…) button will allow you to select a script from your repository. Navigate to the PowerShell script created earlier and select OK.
In the Arguments text box enter the arguments to be passed in to the script. These will be standard argument formatting. I am using named parameters.
<code>
 -maxWarnings "1" -TaskName "Compile"
</code>
Save the build definition and let’s see it in action. On the left side of the Build page right-click your build and select Queue Build.
The new builds have a very useful console display that you can watch the output on. It shows when a task is starting and when it has finished. On the left hand side it has icons indicating which step is running and if they passed.
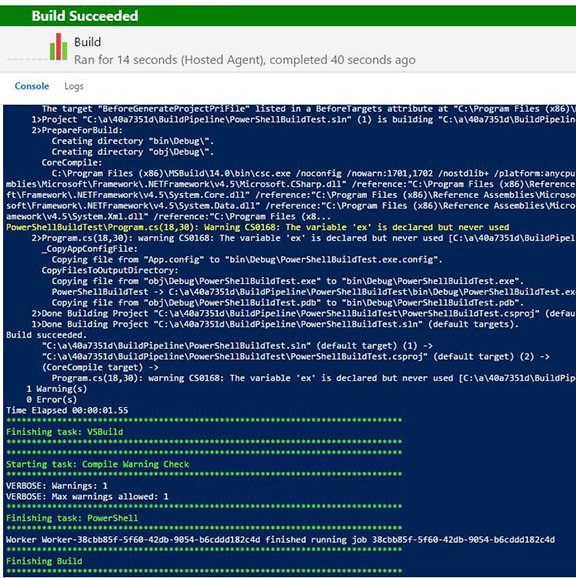
Here you notice that the build succeeded and the two lines we wrote from the PowerShell script have been written out as well. The number of warnings (also seen higher in the console written in yellow) does not exceed the max number of warnings we specified.
Head back to the build definition and edit the max number of warnings to be 0 (we have very high expectations for this project). Save and queue another build.
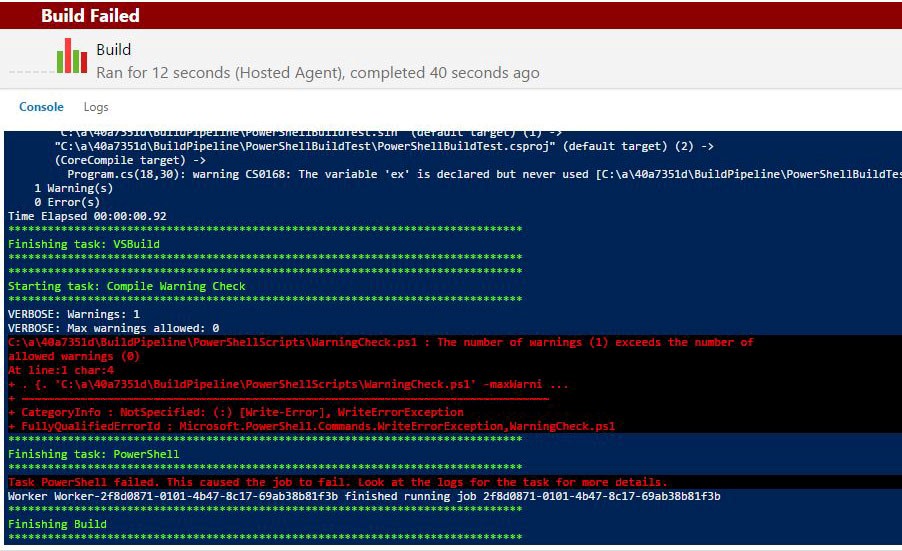
Getting this to run was the first time I was excited to successfully fail a build.
Only the beginning
In this post we took a look at three different tools and services that are each useful to know in depth on their own. Instead of diving into one topic we took a little bit of functionality from each and created something that in itself can be very customizable for different situations.