Creating a Multi-Stage Pipeline in Azure DevOps
Just be sure to keep an eye on the required indents and dashes when creating a pipeline. There are syntax checker add-ons in Visual Studio Code that can help prevent errors.
Plan the Build
For those familiar with the current setup of Azure Pipelines, our end goal is to create the artifact that will be deployed.
This is the plan for the steps needed to create the final artifact:
- Install build requirements
- Restore dependencies (in this case, NuGet packages)
- Build
- Test
- Publish (create application packages)
- Create build artifact (to be used in future stages)
For this part of the pipeline, we will go ahead and put all these steps in a single stage and a single job. Multiple jobs will allow you to run those groups of steps in parallel which isn’t necessary here – all the steps are dependent on the previous step.
Start Writing Code
Create a file in your project with a .yml extension. There is not a required name or location for the file. We usually recommend creating a folder at the top level for it and naming the file something like “pipeline.yml.”

We know there will be one stage, one job and up to six steps, but let’s start with just the first step.
A few notes here:
- The internal name of stages, jobs and tasks do not allow spaces and are not always descriptive. displayName allows for more description and transparency when the items are displayed in Azure DevOps.
- pool/vmImage refers to the virtual machine (agent) the build will run on and we have two options: a Microsoft-hosted agent or a private agent. We’ll go with Microsoft for now as we can get one for free. There are various images available to choose from. In the example above, we are asking for whatever the latest version of Windows is available.
- The first task is the Dot Net Core installer task. We want to make sure that a specific version of the .Net Core SDK is installed that is compatible with our application. The syntax ‘3.x’ is used to specify that it should install the latest of major version 3. (There are a wide variety of tasks available in Azure DevOps by default and available through the marketplace.)
Start Testing the Build
We’ve just started building the pipeline, but let’s take a quick detour and go set up the pipeline in Azure so we can start testing as we go along:
- Build a New Pipeline. In Azure DevOps, select ‘Pipelines’ in the navigation and then ‘New pipeline’.
- Where is your code? We’re using Azure Repos Git here, so setting up a connection to a different repository doesn’t apply, but once the connections are made the pipeline setup will be the same.
- Configure your pipeline. There are options for some pre-made builds, which can be useful starting points. For now, select Existing Azure Pipelines YAML file. If you don’t see it in the default list, then select the Show More button. In the window that opens, select the branch and the path to the YAML file for your pipeline. The path dropdown will pick up on appropriate files in your project.

- Run. Once you’ve selected the file, click the blue Run button.
- You’ll see a screen with the build information and a drill down into the currently running job. On these screens you can see how the displayName property that was set is used.
If you have a passing build, congratulations!

If you don’t have a passing build, it’s time to troubleshoot.
First, double check that the syntax in YAML is correct. Here is an example where there was a missing space after the dash in ‘- job’ on line 5 in the script just used. No drill down is available because the pipeline never executed with this error.

Finishing the Build
Only one task has been added so far to our script. Let’s add the additional tasks.
Some additional notes:
- You will notice that there are fewer steps in the script than what was outlined above. The .Net Core publish command does the restore, build, and publish all in one step.
- The ‘Publish Artifact’ task is different from the .Net Core publish It will allow the artifact to be available to other jobs in the DevOps pipeline (as you’ll see later).
Check in the code, and then in Azure DevOps watch the update pipeline run. It was set up previously and for now, it will automatically run the pipeline on any check in.

The success screen you see will be the same with a few new pieces of information:
- Under Related, you will see that there is one published item. This is the artifact that was created in the last step of the pipeline. Clicking on the link will allow you to see the full structure and download any files. This can be useful for debugging if all the correct files were included.
- Tests and coverage: The test project includes a single test (which hopefully passed).
Some Extra Credit: Triggers, Name, and Variables
While not critical to building a basic multi-stage pipeline in Azure DevOps, adding a build name, triggers, and variables add some helpful functionality. Here’s an example of what they look like added in to the YAML file:
Specifying triggers will reduce how often the pipeline is run. This file directs Azure DevOps to only run the build on pull requests created for the master branch and on a merge to the master branch. We have branch policies in place to require a passing build on Pull Requests.
name creates a unique name for the build. By default, it sets the date and the unique build ID in Azure. In the example below, the default has been overwritten to format the date differently and add the branch name. This can be modified to the format desired for your team.

Finally, variables are pipeline-specific properties that can be reused throughout the file. A variable is referenced using $(variableName) syntax. For example, in the YAML file above the AgentImage has been converted to a variable and referenced using $(AgentImage). While it is currently only used in one place, this will become useful as we extend the pipeline.
It’s possible to stop here and only include the build in YAML, then continue using the existing Azure DevOps Releases UI. But it’s also possible to expand the pipeline so that the deployment steps are also included in the code.
Let’s do that next.
Next, we’ll deploy the packaged code from our build above to two different app services—we’ll call them “staging” and “production”—with the appropriate dependencies between the stages. In true DevOps fashion, we’ll also set a pre-deployment approval check before deploying to the production infrastructure.
Setting Up Azure App Services
In order to deploy the code, we will need a place to host it. If you haven’t yet set up your free Azure App Service plan, go ahead and do that now.
Next it’s time to create Azure resources in Visual Studio Code for both staging and production environments:
- Install the Azure App Service extension
- Hit the F1 key and do a search for ‘Azure App Service create’
- Select Azure App Service: Create New Web App (Advanced)
- Sign into your Azure account
- Follow the steps to create an App Service for the staging environment
- Environment OS must be Windows
- The App Service Plan can be the free tier
- Create another new app and repeat the steps to create an App Service for the production environment
- Use the resource group previously created
- Use the App Service Plan previously created

One additional setup piece that needs to happen is to create a Service Connection in Azure DevOps to your Azure account.
If you have the appropriate permissions in Azure and Azure DevOps, you can complete this automatically. If not, follow these instructions to set it up manually:
- In the Project Settings, select Service Connections
- Create a new Service Connection
- Select Azure Resource Manager
- For the authentication method, select Service principal (automatic)
- Select the appropriate subscription and enter details
- Select Grant access permission to all pipelines and save.
Set Up the Deployment Pipeline in Staging
Now that setup is out of the way, we can get back to setting up the pipeline! First we’ll get the code to the staging instance.
Remember that a pipeline is a collection of stages. Stages can run sequentially or in parallel depending on how you set dependencies up (more on that later). Jobs in a stage all run in parallel and tasks within a job run sequentially.
The applications we work on at MercuryWorks all have functional tests and infrastructure as code which need their own package of files to be sent to the Release. In the build stage we end up having three different jobs: one to build and create the application artifact, one to build and create the functional test artifact, and one to create the infrastructure artifact. They all run in parallel, which reduces the overall time to complete the stage.
Right now, we only have one stage for the build with the last step creating an artifact of the built code. The tasks to deploy this code to the staging infrastructure will be in a separate stage.
This stage will have a few new concepts compared to the build. Click here to see the code in Git. Let’s see what the stage looks like (don’t panic!):
- The first major difference you’ll notice from the build stage is instead of a job listed under jobs it is instead named deployment (line 8). This is a specially named job that allows for additional options than a standard job type, including deployment history and deployment strategies.
- A bit further down there is a property named environment (line 12). This is set to ‘Staging’ because that is what we are naming this environment and in the deployment stage to the production instance it will be named ‘Production’. These environments can be named according to your own environment naming strategy. More on that later.
- The strategy section (line 13) has a variety of lifecycle hooks (also specially named jobs) that can be used in different deployment strategies. You can find a description of all available options here. For this walkthrough we are using the simplest strategy of RunOnce. In RunOnce, each of the lifecycle hooks are executed once, and then depending on the result an on: success or on: failure hook is run. Our application is very simple so we’ll only use the deploy.
- Each life cycle hook has their own set of steps (line 16) to execute. At this point things should look a bit more familiar. First we want to extract the files from the zip that was created in the build, then deploy those files to an Azure App Service.
Dependencies
At this point, the package locations in the extract files task and the package in the deploy step are not filled in yet. We’ve set up the build which created an artifact that needs to be referenced here. Let’s add three more lines and fill in the package location details:
- The deployment stage just added should not run before or in parallel with the Build stage because it needs the artifact created. dependsOn (line 7) provides an array of stages that this stage should verify have successfully completed before running. Using this array on each stage will help arrange the pipeline to run exactly in the order you need. Note that this needs to match the name set to the stage: property, not the display name.
- Typically we want artifacts from the current context – the run that is currently happening, not a previous run. download(line 18-19) is a specially named task that will download artifacts created from previous stages. The artifact specified to download is the one created in the Build stage (it was named ‘app’).
- Now we can tell this task where to find the zip file: archiveFilePatterns/destinationFolder (lines 27–28). The location where artifacts are downloaded to is contained in the variable $(Pipeline.Workspace). This structure was defined in the build, and we can refresh our memory of it by reviewing the artifacts created from the last build. Here we’ll extract files to a new directory and specify a files
- The Dot Net Core publish task put all of the files inside a package(line 32) named the same as the project, which is why there is the extra folder inside the files folder here.

Deploy to Staging
The pipeline is now at a point where we can test it out. Here is what the full pipeline should look like now. Let’s commit the updates and watch it run.
Checking on the build, there are some UI changes now that the second stage has been added:

Clicking into the pipeline, it now shows both stages. Notice the ‘Build’ stage indicates that it has 1 job (0/1 completed as it is currently running). Within the stage is the Application Build job. If there were more jobs within the stage, they would also be listed here.
If you do not see the job list, hover over the stage and click on the up/down arrow symbol that will show up in the top right corner of the box. Clicking into a job will give a further break down of each task and logs.

Once the pipeline has completed, head on over to your site! The endpoint for this will be .azurewebsites.net/weatherforecast. This sample application has no endpoint at the root level.

Deploy to Production Environment
The final stage in the pipeline is to deploy your code to the production App Service. It will be similar to the previous stage we created with a couple exceptions:
- Make sure that the stage and job names (as well as the name of the web app being deployed to) are all updated to indicate they are for production.
- The dependsOnsection has been updated to indicate a dependency on the build stage as well as the staging stage. We don’t want production being released before (or even at the same time) as staging.
As an example, this is what the pipeline would look like in Azure DevOps if the production stage only had a dependency on the build stage (dependsOn: [‘Build_Stage’]).

Notice that the dependency lines show that both staging and production will run at the same time after the build stage has completed? Instead, let’s make sure that the production stage has all the proper dependencies and commit the code.

Congratulations! Your application has been deployed to all environments.
Configure Environments

Before we celebrate too much, there is one last thing we need to do. If you watched the pipeline run, you would have noticed that the production stage ran immediately after staging. While some projects may be able to do that with an appropriate number of tests, most of the time we prefer to have an approval step in between stages.
At MercuryWorks, we use the staging environment to demo new functionality to clients and like to have a bit more planning around when new code is deployed.
This is where Environments come in.
In Azure DevOps under Pipelines in the navigation, there is a section named Environments. After clicking on this, you will see that there are already some environments listed. These were automatically created when the environment property was added to the pipeline script.
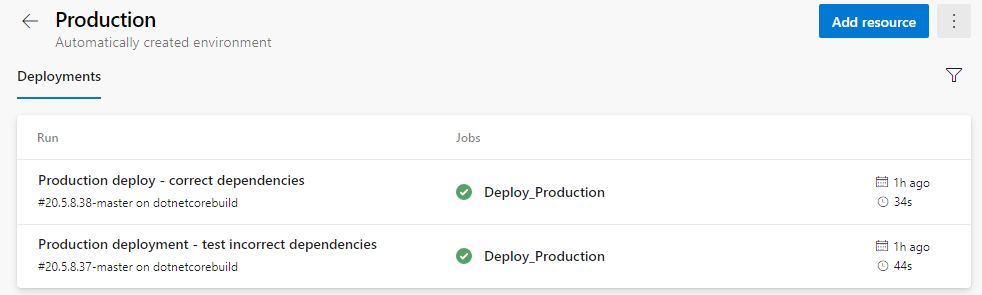
This is a nice, quick way to determine what version of the application is deployed to each environment and what pipeline run it is related to.
Now that those environments are defined, we can set approval gates. When in a specific environment, click on the three-dot menu in the top right and select Approvals and checks.
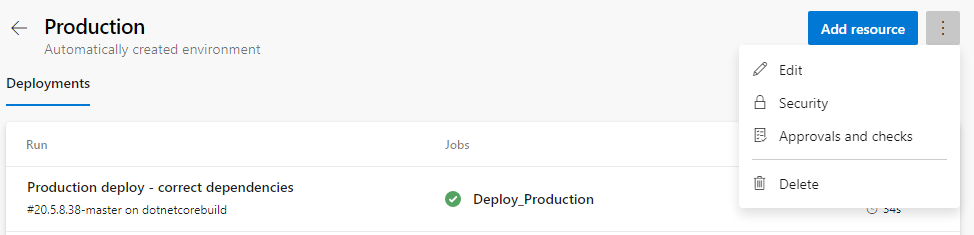
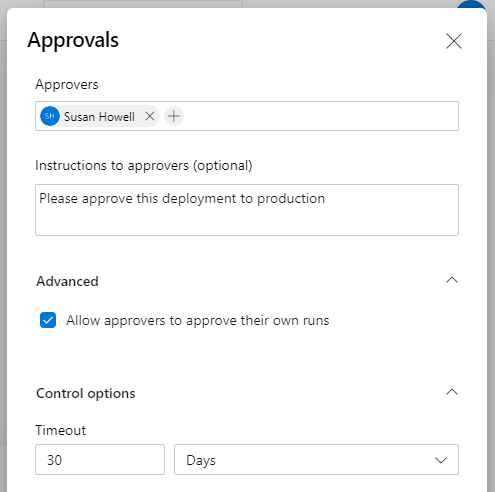
There are multiple types of checks that can be set for an environment. We are only going to be adding an approval for this pipeline, so we’ll select Approvals. On this form you can add specific users and/or groups to the list of Approvers. Fill out the approvers and click ‘Create’.
Head back to the pipeline and select Run pipeline in the top right. Leave the default options, select ‘Run’ and let the pipeline run. Once Staging completes, you should now see Production marked as ‘Waiting’ and the person you set as an approver should have received an email. Logging in as the Approver, there will be a Review button above the pipeline flow.
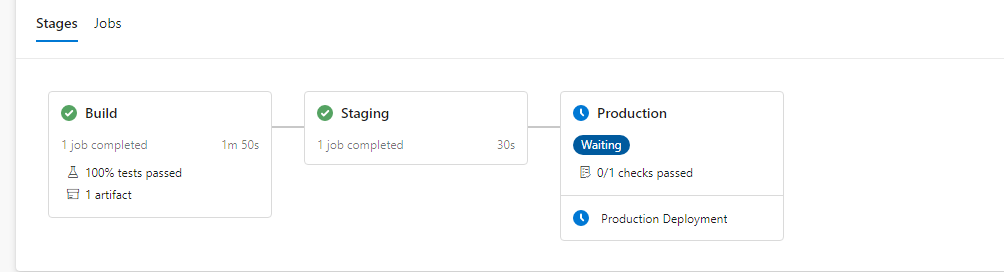
Clicking into Review, the Approver can ‘Approve’ or ‘Reject’ the deployment and add an optional comment.

Once approved, the Production will run as normal. Congratulations! You now have a full pipeline in YAML with multiple environments and approvers.